Table of Contents
No matter how hard Microsoft tries to make Windows 10 a perfect operating system, various issues and problems still occur. While the company works on old errors and problems, users continue reporting about new ones on forums. Computer users have reported numerous issues after Windows 10 Creators Update in spring. However, the situation hasn’t changed with Fall Creators Update too. Windows users continue reporting about various problems that occurred after upgrading to the latest version of OS.

Numerous problems were reported after Windows 10 Creators Update.
Windows 10 Fall Creators Update was released on the 17th of October[1] and provided a bunch new features and… errors. Currently, Microsoft is working on fixing these issues. However, if you still have a dilemma – to upgrade or not to upgrade – you should be prepared for the possible problems you might have to deal.
However, if you already discovered issues with the latest version of the operating system, below you will find quick solutions to the most common problems.
Most common Windows 10 Fall Creators Update problems and issues
While some users have problems with installing Fall Creators Update, others are dealing with connectivity errors, missing files and software problems, and compatibility errors.
Installation errors might prevent from installing Fall Creators Update
Sometimes installing Windows updates might be preventing from upgrading to Windows 10 Fall Creators Update.
Users reported that Windows Update failed to upgrade to the latest OS version due to damaged or missing file problems and connectivity issues. However, some people were stopped from the update process due to Blue Screen of Death (BSOD) errors.[2]
Sometimes the source of the problem was issues related to an Internet connection or available Windows updated. If it’s not the case, you should reset Windows Update app by following these steps:
- Access Settings app.
- Navigate to Update & Security > Troubleshoot.
- Click Windows Update option.
- Click Run the troubleshooter.
- Follow the instructions and click “Apply this fix” when asked.
Error codes following the installation error
During the installation, users report about discovering these error codes:
- 0x800F0922,
- 0x80190001,
- 0x80070070 – 0x50011,
- 0x80070070 – 0x50012,
- 0x80070070 – 0x60000,
- 0x80070070,
- 0x80070008.
These errors are related to Internet connectivity issues. In order to fix them, you should troubleshoot them by right-clicking the network icon on the system tray and clicking “Troubleshoot problems” option.
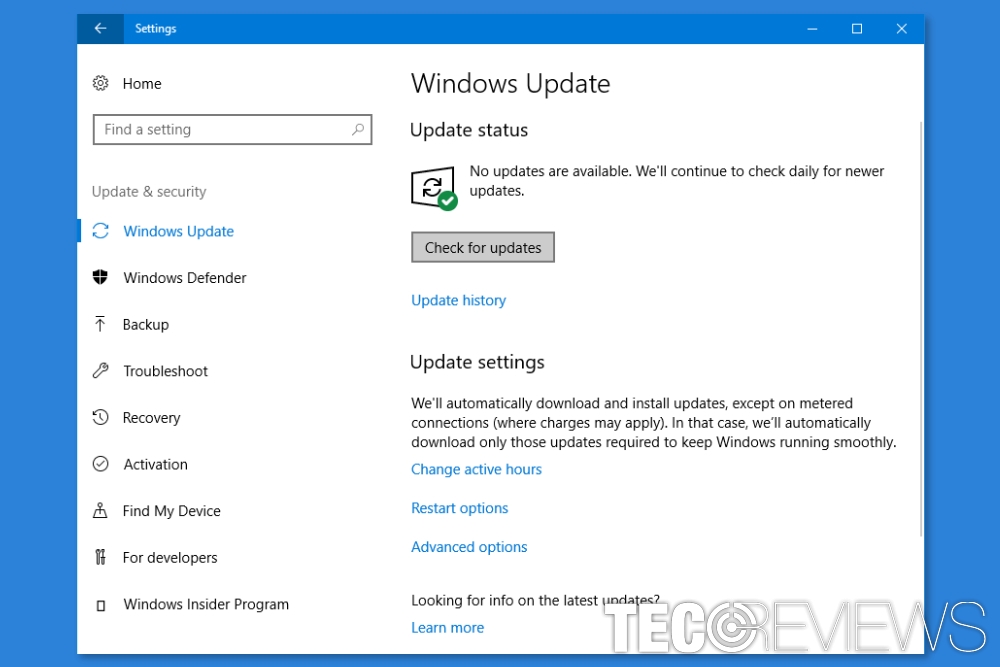
“The update isn’t applicable to your computer” error might disturb upgrade process
Another installation-related error might pop-up on the screen and tell that update is not compatible with your computer. However, this problem can be easily solved by following these steps:
- Access Settings.
- Go to Update & Security.
- Navigate to Windows Update.
- Click Check for updates.
- Install available updates and try upgrading to Windows 10 Fall Creators Update.
High CPU usage noticed after the installation of Fall Creators Update
Slow computer’s performance might be associated with high CPU usage. Windows 10 users report that after the installation, some processes and programs use up to 20% of computer’s resources. However, the majority of reports were related to Microsoft OneDrive Setup (OneDriveSetup.exe) and Sppsvc.exe.[3]
Fix high CPU Usage by Sppsvc.exe on Windows 10
Users report that this process might use up to 30% of the computer’s resources. There’s no doubt that this activity negatively impacts computer’s performance and might even cause a physical damage to the device due to overheating. However, you can find our prepared guide that will help to fix the problem here.
Fix High CPU Usage by Microsoft OneDrive Setup (OneDriveSetup.exe)
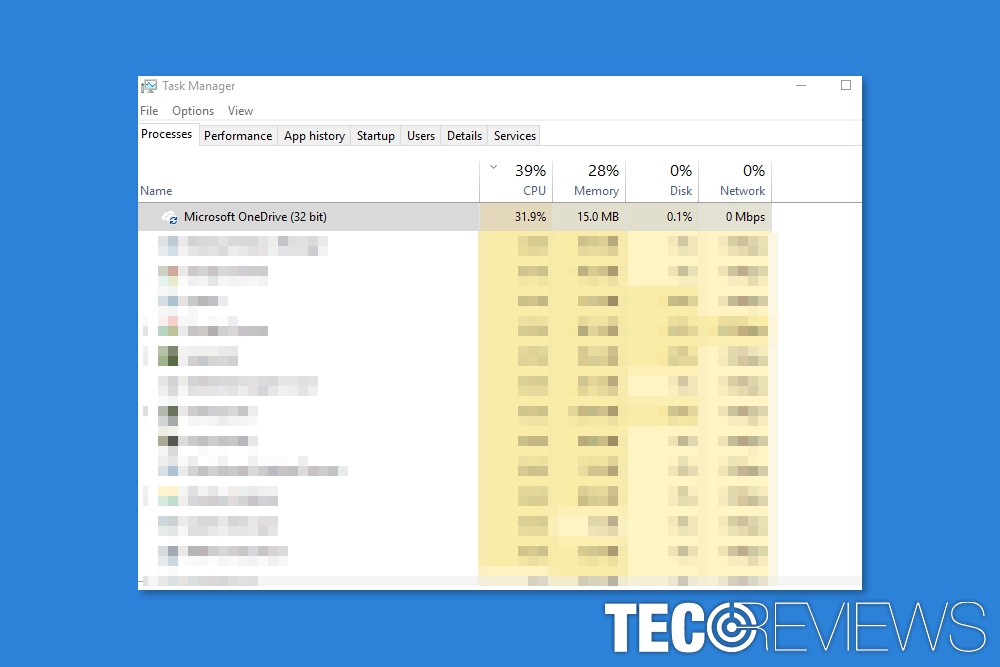
OneDrive might use high CPU and this might be a problem.
OneDrive is pre-installed Windows 10 application. However, after the recent upgrade, OneDriveSetup.exe (Microsoft OneDrive Setup) process is reported of misusing computer’s CPU. It’s important to fix the problem in order to keep your PC working smoothly:
1) Create new local user account
- Click Windows key + R.
- Enter netplwiz and click OK.
- Click Add and choose Sign in without a Microsoft account.
- Click Local account.
2) Log in to a newly created local user account.
- Log off from the account that you were using once you noticed Microsoft OneDrive Setup high CPU usage.
- Log in to a new local account. Make sure that OneDrive is not enabled on this account.
- Go to this location: AppData\\Local\\Microsoft\\OneDrive\\Update\\OneDriveSetup.exe.
- Right-click OneDriveSetup.exe entry and choose Run as Administrator option from the drop-down menu. This should start OneDrive.
- Log off from the new account and login to the old account.
- Find OneDrive, right-click it and choose Exit from the drop-down menu.
- Go to C:\\Users\\New User\\AppData\\Local\\Microsoft\\OneDrive and copy these entries:
(Version name example: this time it is 17.3.6917.0607) Folder
Settings folder
Setup folder
Update folder
OneDrive.exe
OneDriveStandaloneUpdater.exe - Go to C:\\Users\\Original user\\AppData\\Local\\Microsoft\\OneDrive and paste copied entries.
NOTE. “Original User” in the path stands for the accounts name. - Turn off OneDrive again to update version notation.
- Find OneDriveSetup.exe and right-click it. Choose Run as administrator.
Once you complete this step, this error should be fixed. However, if the problem is not solved or you see other strange processes running in the Task Manager in high CPU, this activity might be related to computer infection, such as crypto-currency miners. Therefore, you should also make sure that any malicious components were not installed by scanning the device with reputable antivirus.[5]
COMMENTS